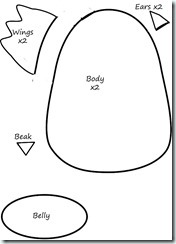
As promised, here is the template for making the felt owl:

Print it out on an A4 sheet and cut out the template pieces. It’s fairly easy to put together, but I’ve added a few instructions in case you need them.
You will need felt in whatever colours you feel like. We used 1 colour for the front and back pieces, and then scraps of other bright coloured felt for the rest of the owl pieces. You will also need some embroidery thread, stuffing and 2 large buttons.
1. cut out the pieces of felt from whatever colour of felt you’d like
2. Use 2 strands of embroidery thread to sew the belly shape onto the owl
3. Sew the beak on the front of the owl
4. Take your buttons and sew them on either side of the beak
5. Take the two body pieces and place them together. Pin the ears and wings in place, between the two body layers.
6. Sew around the edge of the owl, which secures the wings and ears. We used a running stitch, but you could use a blanket stitch if you prefer. Leave a small hole in the edge so you can stuff the owl.
7. Pop some stuffing inside the owl, and then finish sewing around the edge.
Here is a photo of the owl my daughter made, so you can get an idea of what it should look like:
Hope you like the owls. If you make any I’d love to see them.
Sally
xxx

