Sunday 31 October 2010

A+ Skirts earn an A+ for simplicity

You may remember a couple of weeks ago I was lucky enough to win a pattern for an A+ Skirt from Make it Perfect.  Well today I finally made the skirt, and here it is:

I couldn't believe how easy it was to make.  I've never ever done any dressmaking before, and I made it without having to unpick a single stitch.  The instructions are so clear, so if you're thinking of making a skirt, I can thoroughly recommend this pattern.

Here is another view of the skirt - this time with me wearing it (although I've cut off my head as it was a terrible photo of me!)
I'm so excited I want to make more of them, so tomorrow I'm off to the fabric shop for more fabric, and soon I'll have a whole wardrobe of fantastic skirts.  I think perhaps a funky patterned corduroy next, with a pair of chunky knitted tights underneath - makes me cosy and warm just thinking about it.

Saturday 30 October 2010

Christmas Fun

As I've not managed to do much crafting this week, I thought I'd share our Christmas plans with you all. 

Several years ago we decided that for the adults in our family we would only buy presents costing £2.  This lead to some of the funniest and most useful presents we've ever had (Sock clips anyone?).  After a couple of years we got a bit bored and began to have themes, so far we've had "handmade" and "recycled".  This year we've taken things further & all presents have to be free - yep you heard right, completely and utterly FREE!

Now, if you are a member of my family, and are expecting oodles of free gorgeousness, please STOP READING NOW, for fear of spoiling the anticipation you have ready for 25th of December.  Others of you are welcome to read on:

These freebies have been sourced mainly on the internet but also through visiting stands in shopping centres, completing surveys, and through entering competitions.


As we are getting closer to Christmas with all the special offers in the shops, I'm also planning on adding some Buy One Get One free offers to this selection. 

If any one's interested, comment below & then I'll even share how you can gift a safari experience (of a sort!) for £2!

PS - This is what happened when I left my 10 year old son & husband alone with a pumpkin and a sharp knife - Just thought I'd share!

Thursday 28 October 2010

Half Term Chaos

Bit low on the crafty posting this week, it's half term here, and as well as having my own children off school, I'm playing host to family visitors. 

Haven't had time to touch my sewing machine, however I did watch Cats & Dogs 2 at the cinema, have been to McDonalds, and tomorrow I have the joy of attending a Halloween Disco on roller-skates?!  Will the fun never cease?

Rest assured that next week normal service will be resumed - I'll be sewing so fast that my sewing machine will have flames coming off of it & I will be drowning in fabric goodies.

Enjoy your half term whatever you are doing.

Tuesday 26 October 2010

Reversible Dolly

Yesterday I went into Salisbury and discovered the magazine Homestyle Sewing.  So obviously I just had to buy it!  It had a free gift pack on the front with some fabric, ribbons, buttons, embroidery threads & felt.  They had several suggestions with what to make from it, but as I didn't feel like making any of them, I decided to make my daughter a rag doll.  Did you ever have one of those dolls that you lifted the skirt and it turned into another doll?  I remember having a Little Red Riding Hood one, with the wolf hidden under the skirt.  Sadly that one is long gone, but as my daughter is doll mad, I thought she might like one.  Here is what I came up with:
Dolly is asleep!
Dolly is now awake.

I'm not sure if I've explained the idea of these dolls very well, but here is another photo of it, which will hopefully show you what I mean.
Only took a couple of hours to figure out how to make it, however I did have to hand stitch the skirt to the body - hence the ribbon to hide my terrible stitching!

A fun way to spend a rainy day & my daughter loves it.

Friday 22 October 2010

Bat Mask Template

Tonight is the Halloween party at my youngest two children's school.  I have been roped into helping the children to decorate masks.  To that end I've spend many hours over the last two days drawing & cutting out masks for them to decorate.  I've made 54!  My fingers are so sore from cutting out & my cutting mat has many new slices out of it from the craft knife I used to cut the eyes out!  Here are all the masks:


Somebody else has cut out another 45ish so hopefully we have enough in case every child in the school wants to make a mask, if not we're taking spare card to make some more.

So as I'm feeling generous I thought I'd share the template for the bat mask in case anyone out there needs a halloween craft to do with their children.  My 12 year old son who is very talented at art drew the pattern for me.


I am hoping that if you click on it & print it out as A4 size that it'll come out ok.  I've never tried this before, so please let me know if it doesn't work, or if you know a better way for me to add a template.
Hope that you'll find a use for the pattern & I'd love to see photos of any masks you make from it.

Wednesday 20 October 2010

I Love Royal Mail

Today was a much more successful day.  It started in the best possible way, I had two postal deliveries.  The first was the pattern I was lucky enough to win from the giveaway on Make It Perfect.  Its a fab pattern for several different variations of an A-Line skirt.


Have opened it and had a quick look at the pattern and it seems lovely and straightforward (which is just as well as I've never made clothes for myself)  I can't wait to get started, but I must .. I must!

The other package I received was my business cards.  I'd ordered them on 14th October & they arrived today.  Super Speedy!


I got them from Moo.com and I'm really pleased with how they've come out.  Unfortunately I can't claim credit for the reverse of the cards - I was lazy and picked one of their ready made designs.

Sewing wise, I managed to finish the piece of work for Sew Hip (no, I can't tell you what it is, you'll just have to wait for the magazine to come out & buy it)

I also made four more lunch bags ready for the craft fair I'm doing on 20th November, and cut out the pieces for another two.

This evening I attended my first online maths session through my sons senior school.  It was strange to sit learning maths knowing that there are 15 other people at their own houses, all writing via graphics tablet, on the same virtual whiteboard.  It was brilliant though and nice not to have to leave my warm house on a chilly night like tonight.  Hopefully what I've learned will let me help my eldest son with his maths homework.

And so now I'm off for a bar of chocolate & a sit down on the sofa in front of some mindless TV - I think I've earned it.

Monday 18 October 2010

Nothing to declare

Sorry nothing of note to say today.  I've had one of those days where everything I touched went wrong, fell apart or didn't fit. 

The pumpkin hat I made for my daughter ended up so small it'll just about fit her dolly, the piece I'm working on for the magazine Sew Hip looked nothing like it was supposed to, and to top it all I ran out of zips so couldn't make any more coin purses.  

But I'm determined that tomorrow is going to be a fab day, I'm going to sew from the moment the children are at school, until pick up time.  Everything I touch will turn itself beautiful with the minimum of effort and most of all I will wake up skinny, with flawless skin and hair.  Watch this space!!!

Sunday 17 October 2010

Pumpkin Costume Tutorial

As promised, here is the tutorial for the pumpkin costume I've made for the school Halloween party on Friday.  Have tried to use a lot of photos to illustrate what I've done - let me know if there is anything that isn't clear.
I made this pattern for my daughter who is 6, but the height of a 9 year old!  Adjust the length for the size you need.

I used 2 yards of orange fabric & the same of firm interfacing as my fabric was quite flimsy, and I wanted it to hold its shape better.  If your fabric is quite thick then you may not need to use this. I also bought 4 yards of orange ribbon to gather the top and bottom, but you could use elastic if you felt like it.

You will also need some black felt for the features and some fabric glue or bondaweb to attach them to the costume.

Make your paper pattern:

Cut a piece of paper 36” long  and 10” wide and fold it in half length ways to make a piece 36” x 5” (this is just to make sure both sides of the pattern match)
The top of each pumpkin piece needs to be 5” in width, so measure 2.5” from the fold and make a mark

For the bottom of the pumpkin shape, make a mark 3.5” from fold as the bottom needs to be 7”


Find the centre (18” from each end)  make a mark at the outside edge.

Draw a curved line from the top mark, touching the centre line & down to where you’ve marked at the bottom.  I hope you can see what I mean from this photo.

Cut out the pattern along the drawn lines.  Open out the pattern & you should be left with a sort of leaf shape, but with the top & bottom chopped off.


Use the pattern to cut out 6 of these shapes from your orange fabric, then cut 6 from interfacing if you are using it. 

Iron the interfacing onto the reverse of each fabric shape.

Place 2 fabric shapes together, right sides together and sew along one edge.  Open out.  Sew the next shape on in the same way and continue until  you have sewn all 6 side by side. 


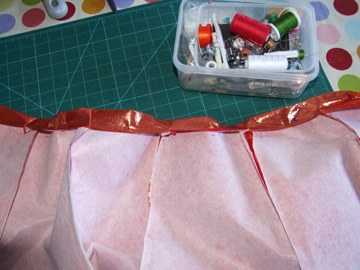
Do not sew the final seam yet.  Make a mark 2.5” down from each of the top panels & fold the top down to touch the mark.  Pin in place.  This is to make a channel for the ribbon to go through.


Sew along the bottom of the channel.  Repeat in the same way for the bottom of the pumpkin.
Using a safety pin, thread ribbon through the channels you’ve made.


Now sew the 2 ends of the pumpkin together to make a big circle – don’t sew through the channels though, just stop before them.  This will not notice when your child is wearing it.

Turn pumpkin in right way & try it on you/your child/your mother/your dog.  Mark where you need the arms to be & cut them out.  If your fabric frays, you will need to hem them or use a fray stopping liquid.  Luckily mine didn’t fray so I didn't bother.

Cut features out from black felt & glue, sew or bondaweb them to the front of the pumpkin.


Gather the top & bottom of the pumpkin by tying the ribbon. 


My daughter modelling the pumpkin costume:


I may yet pad it with cushions or add a wire inside it to make the costume puff out a bit more.  The bottom ribbon could also be tied around the waist to make more of a puffball shape:


If anyone makes one of these costumes, I'd love to see it.  Tomorrow I'm planning on making a hat to go with it.

Friday 15 October 2010

Back to sewing

Yippee - today I managed to do some sewing!  My machine was beginning to think I'd abandoned it.

Firstly I got all of my bags ready for tomorrow's market.  I'm taking 3 of the monster bags again, but this time I have the felt monsters to go in them.  Fingers crossed, with Christmas fast approaching, I may get some sales.  I've also got a couple of backpacks, two lunchboxes, a couple of the lovely shopping bags (which I'm secretly hoping won't sell & then I get to keep them), some doorstops and a shoulder bag, which hasn't yet featured on my blog. 

I'm hoping that there will be more people there tomorrow as it is the 20th birthday of the market and they are having a grand opening, with ribbon cutting, free coffee & cake!  Will let you know what happens.

The other thing I have done today is to make 2 scarves.

I had a bit of cotton batting left over from making a quilt and so decided that as the weather is getting a bit chilly now, quilting would be a good idea for a scarf.  I used the fabric I received yesterday, and was quite pleased when it only took me about half an hour for each scarf.  Here is a closer view of them.
I used a curvy stitch on my machine to do the quilting and just ran it length ways up the scarf.  They are slightly stiffer than I'd like, but am hoping after a gentle wash that the fabric will soften up. (no - I didn't wash it before I made them - I'm much too impatient for that!)

I've also got on with part of the pumpkin costume - but am saving that for a later post.  Plus I want to make sure it works before I put a tutorial up!  But without giving too much away ... it's very orange!!! 

Thursday 14 October 2010

Pumpkin Costume and Gorgeous Fabric

No blog post yesterday as my wonderful children decided to share their stomach bug with me.  I was not impressed to say the least! 

So today, to cheer me up, I went to Fabricland in Salisbury again.  I seem to spend most of my life (and my money) in there.  My excuse for this visit was that my daughter has asked for a pumpkin costume for the Halloween school party next week.  Halloween falls in half term, so the school are having a fundraising party the week before.  So, I needed to get some orange fabric.  I found the most beautiful fabric


I think she will be the most glamorous pumpkin ever!  Am not quite sure how I'm going to make the costume yet - am thinking it may involve wire or a hula hoop to create the shape, but am still pondering over the options.  Any ideas would be welcome.  It needs to be fairly quick and easy to make as I also need to make a costume for one of my sons, plus as I'm a helper at the party, I need a costume too.  I think what I really need is an extra hour in each day - or perhaps I can give up sleeping!

The other great thing that happened today was that I received my order of fabric from Fabric Rehab


This cream fabric (Pure Love Heart) is to make scarves for myself & my daughter, maybe with a fleece lining, I'm not sure yet.


this mini blues and green bundle is to make some more small purses 


I'm not sure what I'm planning with the two Moda Freebird bundles, but I knew I just had to have them.  Am thinking along the lines of a quilt, but think I may need to just have them on my shelf & look at them every so often, until inspiration strikes.

Tuesday 12 October 2010

Tote Bags

I bought some beautiful fabric in Laura Ashley a while back.  It was in their remnant bin & I fell in love with it.  Its been in my fabric box ever since.  Today was its day. I dug it out and decided that because the pattern is pretty large, that I would make tote bags with it.  And here is one of them:
The bags have come out a lot better than I could've hoped for.  I used a french seam (think that's what its called!) inside as the fabric frayed quite badly.  This tidied it up a lot and hid the fraying edges.  Hopefully it'll be stronger too.  Have made the handles extra secure by attaching them by sewing a cross inside a square.  I was intending on selling them at the market this weekend, but I love them so much, I'm not sure I can part with them!

Monday 11 October 2010

Little Purses

At the market last week I had a request for small change/make up purses.  I had a selection of handbag pouches out and the lady in question wanted one about half the size of those.  This is what I've come up with.


They're each about 5" x 3" in size, and just made with scraps of fabric I had left over from varying other projects.  Each of them are lined, some with white cotton and others with a complimentary fabric.  I've also added a small piece of ribbon to each zip pull, just to smarten the zips up.  

(Did you know you can stop a ribbon fraying by holding the ends near to, but not touching, the flame on a candle.  I just love watching the ends melt - its strangely pleasing!)

 The best thing is that these purses only take about 15 minutes to make.  I love cheap and simple crafting.

Sunday 10 October 2010

Winning & More monster making

Had a bit of excitement today when I read through the blogs I'm following - I actually won a giveaway.  Make it Perfect had a pattern giveaway for their fab A+ skirts and I was picked to win it.  The strange thing was that when I was in Fabricland in Salisbury yesterday I picked up a remnant of cotton that I liked the pattern of. 


I thought it that it'd make a lovely skirt for the winter, but the only problem was that I didn't have a pattern - how strange that I should win the pattern today.  I can't wait for it to arrive, although I'll have to work out which one of the lovely variations to make first.

Sewing-wise, I accomplished quite a bit today.  I've finished 8 of the 10 monster bags that I'd been making,
 
and then I also made 2 of the felt monsters to go inside the bags.
Quite a good days work, all I need to do now is to photograph them properly, add them to my website & sell, sell, sell.

Thursday 7 October 2010

Harvest festival ... and more monsters

I've had a lovely day today.  When I got up the sun was shining, we walked to school and even though it was pretty chilly, the view once you get up the hill to school was breathtaking.  One day I'm going to have to take my camera and get a photo of it.  Then it was back down the hill to the church for the primary school's harvest festival, which again was absolutely lovely.  The children sang up well and read their poems so nicely that it made me feel really uplifted.

So what did I do this afternoon - I made monsters.  10 of them to be precise.
I didn't actually manage to finish any of them, but I cut all the fabric, and the monsters out, and sewed parts of the monsters to the front of the bags.  I haven't yet managed to outline them all, but that part comes tomorrow.
Here is a closer photo:
and another one:
I also cut the fabric for the insides of the bag, plus the handles in varying colours.
They are really colourful and cheerful, and I can't wait to finish making them tomorrow.

Tuesday 5 October 2010

Blue Monsters have Hatched

Today I heard scratching from the bag of fabric I was keeping the monster eggs warm in, and when I looked closely, I found....
As you can see he was a bit shy at first, but with a bit of coaxing and the promise of a chocolate biscuit for being a good monster (I have learned something from being a mum!) he stepped forward and allowed me to photograph him properly.

His friend meanwhile had no such just-been-born nerves and gave me a huge grin, hoping no doubt for a chocolate biscuit too.
Lets just hope that the good behaviour continues! 


Sunday 3 October 2010

Monster Bags have spawned!

Had no luck selling my monster bags at the market yesterday, had a lot of positive comments on them, but no takers (is £5 too expensive?)  So in the spirit of experiment I decided that with Christmas coming, perhaps if I added something else to the bags they would encourage people to buy them for their children/grandchildren/cousins/best friends.
Here is what I've made:
The monsters are made of felt and stuffed lightly with toy stuffing.  Am thinking of charging £8 for both.  Fingers crossed they'll sell at the next market, but I'll probably add them to my website over the next week too.  Blue monsters are also showing signs of hatching, watch out for them soon.

Friday 1 October 2010

Even more Little Bags

Have been busily getting ready for the farmers market tomorrow and suddenly realised what it was lacking - Monsters!  So here are my contributions to making the market more monstrous.

As the more observant of you may notice, they are the same style as the little bags I wrote a tutorial on at the beginning of September.  See here if you missed it. 
Some closer photos of the monster bags:

I've used Bondaweb to stick the monster's pieces together and then either used a close zig-zag stitch or running stitch to outline each of them.  I plan on making more in different colours with different monsters, but as the market is tomorrow morning, I think I'll have to just stick to the 2 I've already made.  Fingers crossed they'll sell, will update you tomorrow to let you know.